In order to integrate site to site VPN between AWS and Digitialocean, we need opensource-software called openswan and strongswan.
1. Prerequisites
- AWS:
- Amazon Linux 2 AMI
- Private IP: 10.0.160.71
- ELastic Public IP: 18.136.225.10
- Installed on public subnet
- Openswan IPsec
- VPC IP Range: 10.160.0.0/24
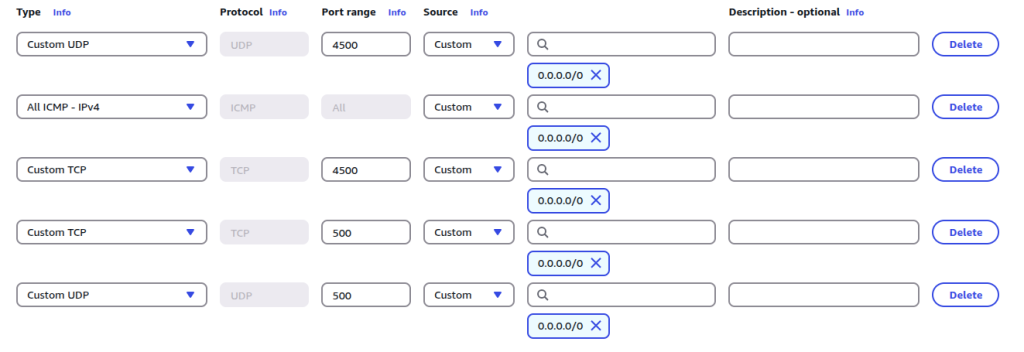
- Firewall attached (security group), so we need to open some ports, UDP: 500, 4500. TCP: 500, 4500 and ICMP IPv4
- Amazon Linux 2 AMI
- Digitalocean:
- Ubuntu 22.04
- Private IP: 10.124.0.2
- Public IP: 146.190.158.244
- Installed on public subnet (by default is public subnet, AFAIK)
- Strongswan IPSec
- VPC IP Range: 10.124.0.0/20
- No firewall attached, no need to open port (all ports are already opened)
- Ubuntu 22.04
2. Cipher Suites Requirement
Both server will use cipher suites / algorithm to encrypt the data in transit. Here are the details:
- Pre Shared Key = PSK-m3n@kddi9d-1
- phase 1
- ike version = 2
- AES128, SHA 512, Diffie Helman Groups: 18
- Key lifetime = 8h (36000 seconds)
- phase 2
- AES128, SHA 256, Diffie Helman Groups: 14
- Key lifetime = 1h (3600 seconds)
Let’s get started!
3. Install and configure openswan on AWS
- Login to server (Amazon Linux 2 AMI) using SSH
- Switch to root user, by typing:
sudo su- Update package repo before installing openswan
yum update -y- Install openswan
yum install openswan -y- Enabling ip forward, etc on OS level
vi /etc/sysctl.confFill it with this content:
net.ipv4.ip_forward = 1
net.ipv4.conf.default.rp_filter = 0
net.ipv4.conf.default.accept_source_route = 0- Restart sysctl by using this command:
sysctl -p- Configure firewall (security group). Open your security group and add some ports in inbound rule.
- UDP: 500, 4500
- TCP: 500, 4500
- All ICMP IPv4

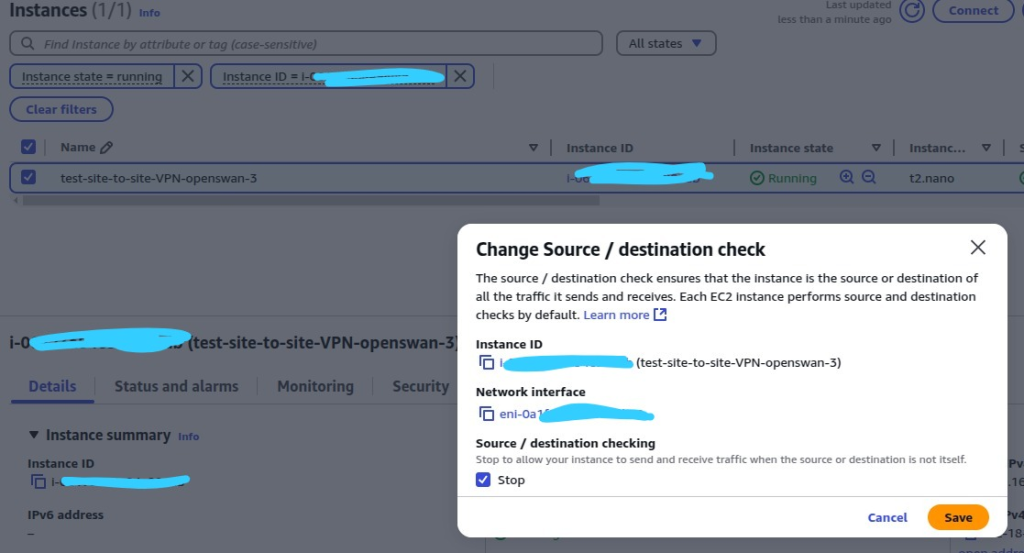
- Go to your EC2 instance (Amazon Linux 2 AMI), right click > Networking > Change Source / destination check > Source / destination checking (Stop)

- Configure openswan, we are going to create a file named aws.conf under /etc/ipsec.d/
vi /etc/ipsec.d/aws.confFill it with this content:
conn aws-to-digitalocean
        authby=secret
        auto=start
        left=%defaultroute
        leftid=18.136.225.10
        right=146.190.158.244
        type=tunnel
        leftsubnet=10.0.160.0/24
        rightsubnet=10.124.0.0/20
#phase 1
        keyexchange=ike
        ikev2=yes
        ikelifetime=8h
        ike=aes128-sha2_512;modp8192
#phase 2
        keylife=1h
        keyingtries=%forever
phase2alg=aes128-sha2_256;modp2048- Create file aws.secrets and put Pre Shared Key (PSK) into the file:
vi /etc/ipsec.d/aws.secrets18.136.225.10 146.190.158.244: PSK "PSK-m3n@kddi9d-1"- After configuring openswan, you can start openswan service by:
ipsec start
ipsec status
You will see Total IPsec connections: loaded 1, active 0. Active is still 0 because we haven’t set up remote end (strongswan).. yet. So let’s follow the next step to install and configure strongswan.
4. Install and configure strongswan on Digitalocean
- Login to ubuntu 22.04 using SSH
- Switch to root user
sudo su- Update package repo
apt-get update -y- Install strongswan
apt-get install strongswan -y- Enabling ip forward, etc on OS level
vi /etc/sysctl.conf- Fill it with this contents:
net.ipv4.ip_forward = 1
net.ipv4.conf.default.rp_filter = 0
net.ipv4.conf.default.accept_source_route = 0- Reload sysctl configuration:
sysctl -p- Configure strongswan, we are going to reconfigure ipsec.conf
vi /etc/ipsec.confconfig setup
#none
conn %default
ikelifetime=8h
keylife=1h
keyingtries=%forever
authby=secret
keyexchange=ikev2
conn digitalocean-to-aws
left=146.190.158.244
leftsubnet=10.124.0.0/20
right=18.136.225.10
rightsubnet=10.0.160.0/24
auto=start
type=tunnel
esp=aes128-sha2_256-modp2048
ike=aes256-sha2_512-modp8192- Configure ipsec.secrets, paste Pre Shared Key into that file
vi /etc/ipsec.secrets146.190.158.244 18.136.225.10 : PSK "PSK-m3n@kddi9d-1"
5. Start openswan and strongswan service
Now, let’s start openswan and strongswan on both server. After restarted, it should be successfully integrated.
5.1 Start openswan service
ipsec stop
ipsec start
Now if you check the ipsec status, it’s connected!
ipsec status
5.2 Start strongswan service
The command is the same as openswan, as follows:
ipsec stop
ipsec start
Now check the ipsec status, it would be connected:
ipsec status
6. Test ping
As you see above, both server have connected each other. Now let’s test with ping command.
Run ping 10.124.0.2 from Amazon Linux 2 AMI. The ping should have reply.

Run ping 10.0.160.71 from Ubuntu 22.04. The ping should have reply also.
