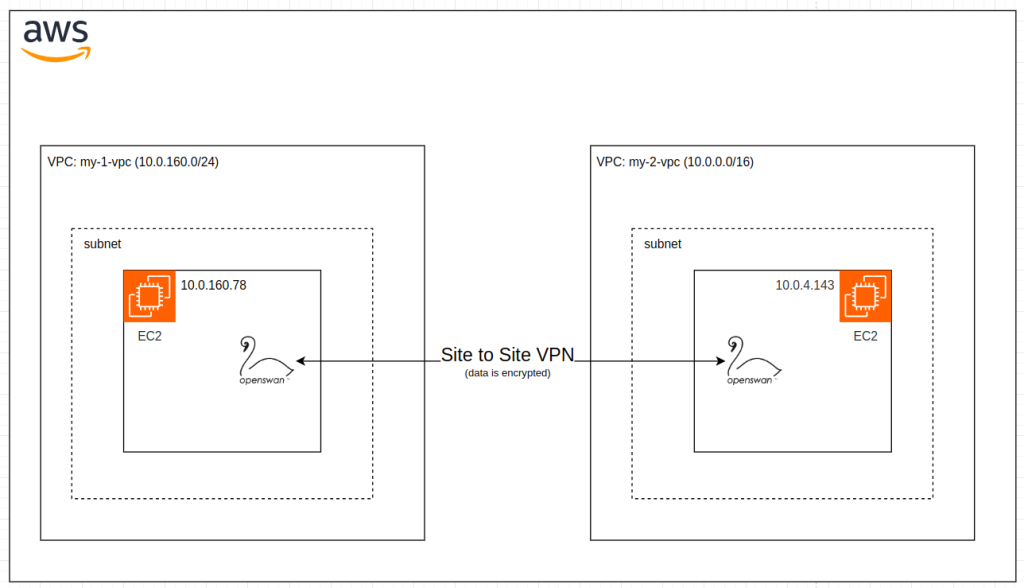
In this tutorial we are going to setup site to site VPN on EC2 Amazon Linux 2 AMI by using openswan.
Site to site VPN means 2 different network on internet can communicate each other by leveraging secure connection (IPSec), so all connection will be encrypted over the internet.
1. Diagram
Here is what we will create:

2. Prerequisites
- EC2 instance – Amazon Linux 2 AMI
- IP public: 46.137.254.x
- IP private: 10.0.160.78
- VPC: my-1-vpc
- CIDR: 10.0.160.0/24
- EC2 instance – Amazon Linux 2 AMI
- IP public: 52.74.86.x
- IP private: 10.0.4.143
- VPC: my-2-vpc
- CIDR: 10.0.0.0/16
- Openswan installed on both EC2 instances
3. Install openswan on both EC2 instances (46.137.254.x and 52.74.86.x)
- Ensure SELINUX is already disabled. If not, change to disabled and restart your server
cat /etc/selinux/config- Login to server using SSH
- Update package repo first:
yum update -y- Install openswan by using command:
yum install openswan -y4. Configure sysctl.conf on both EC2 instances
We need to configure sysctl to update kernel parameter to each server
vi /etc/sysctl.confAdd these configurations to the end of the line.
# example entries for /etc/sysctl.conf
# forwarding is needed for subnet or l2tp connections
net.ipv4.ip_forward = 1

# rp_filter is stupid and cannot deal decrypted packets "appearing out of
# nowhere"
net.ipv4.conf.default.rp_filter = 0
net.ipv4.conf.all.rp_filter = 0

# when using 1 interface for two networks when using NETKEY, the kernel
# kernel thinks it can be clever by sending a redirect (cause it cannot
# tell an encrypted packet came in, but a decrypted packet came out),
# so it sends a bogus ICMP redirect
net.ipv4.conf.all.send_redirects = 0
net.ipv4.conf.default.send_redirects = 0
net.ipv4.icmp_ignore_bogus_error_responses = 1
net.ipv4.conf.default.log_martians = 0
net.ipv4.conf.all.log_martians = 0
# seems the martian settings are not always enough. If not receiving packets
# try running this:
# for n in eth0 mast0 ipsec0 ipsec1 all default ; do sysctl net.ipv4.conf.$n.rp_filter=0; done
#

# these are non-ipsec specific security policies you should use
net.ipv4.conf.default.accept_source_route = 0
net.ipv4.conf.all.accept_redirects = 0
net.ipv4.conf.default.accept_redirects = 0

# When using KLIPS in some situations, you will see errors like:
# [ 8648.409997] __ratelimit: 168 messages suppressed
# [ 8648.410009] Neighbour table overflow.
# Especially when on large cable networks, though we've also
# seen it when using combinations of xen/bridging/VM's.
# If you do, and you are SURE there are no routing loops,
# you can try these below:
#
net.ipv4.neigh.default.gc_thresh1 = 1024
net.ipv4.neigh.default.gc_thresh2 = 2048
net.ipv4.neigh.default.gc_thresh3 = 4096- Then reload the new configurations:
sysctl -p5. Configure openswan on EC2 instance 46.137.254.x
We create file named aws.conf under ipsec.id folder:
vi /etc/ipsec.d/aws.confFill the content with:
config setup
        logfile=/var/log/pluto.log
conn Tunnel1
	authby=secret
	auto=start
	left=%defaultroute
	leftid=46.137.254.x
	right=52.74.86.x
	type=tunnel
	ikelifetime=8h
	keylife=1h
	phase2alg=aes128-sha1;modp1024
	ike=aes128-sha1;modp1024
	keyingtries=%forever
	keyexchange=ike
	leftsubnet=10.0.160.0/24
	rightsubnet=10.0.0.0/16
	dpddelay=10
	dpdtimeout=30
dpdaction=restart_by_peer- We named the connection with Tunnel1
- leftid and right are IP public EC2 instance
- leftsubnet and rightsubnet are IP private Ec2 instance
And we have to create Pre shared key configuration file. Create file aws.secrets
vi /etc/ipsec.d/aws.secretsFill with:
46.137.254.x 52.74.86.x: PSK "_PB7O91Fvo5u84.it19B81Gebnw5Aop5"6. Configure openswan on EC2 instance 52.74.86.x
vi /etc/ipsec.d/aws.confFill the content with:
config setup
        logfile=/var/log/pluto.log
conn Tunnel1
	authby=secret
	auto=start
	left=%defaultroute
	leftid=52.74.86.x
	right=46.137.254.x
	type=tunnel
	ikelifetime=8h
	keylife=1h
	phase2alg=aes128-sha1;modp1024
	ike=aes128-sha1;modp1024
	keyingtries=%forever
	keyexchange=ike
	leftsubnet=10.0.0.0/16
	rightsubnet=10.0.160.0/24
	dpddelay=10
	dpdtimeout=30
	dpdaction=restart_by_peer
And also create Pre shared key configuration file named aws.secrets:
vi /etc/ipsec.id/aws.secretsFill with:
52.74.86.x 46.137.254.x: PSK "_PB7O91Fvo5u84.it19B81Gebnw5Aop5"7. Add some ports to inbound rules security group
Openswan uses some UDP and TCP ports. Add these ports to each EC2 instance inbound rules – security group:
| Type | Port | Source |
| UDP | 4510 | 0.0.0.0/0 |
| UDP | 4511 | 0.0.0.0/0 |
| UDP | 500 | 0.0.0.0/0 |
| UDP | 4500 | 0.0.0.0/0 |
| ALL ICMP – IPv4 | All | 0.0.0.0/0 |
| TCP | 4500 | 0.0.0.0/0 |
| TCP | 500 | 0.0.0.0/0 |

8. Start IPsec service on both EC2 instances
After we made the configuration, lets start the service on both ec2 instances:
systemctl start ipsecWait for some seconds until the service is up, and you will see IPsec has connected
systemctl status ipsecEC instance 46.137.254.x

EC2 instance 52.74.86.x

9. Test ping from 46.137.254.x to 52.74.86.x
The goal of this tutorial is to see if IP private on both server can be pinged.
- IP public: 52.74.86.x has IP Private 10.0.4.143, so we do pinging with IP private
ping 10.0.4.143
10. Test ping from 52.74.86.x to 46.137.254.x
- IP 46.137.254.x has IP private 10.0.160.78
Ping to IP private, and it is reply.
ping 10.0.160.78